Contact Us

Use the form on the right to contact us.

You can edit the text in this area, and change where the contact form on the right submits to, by entering edit mode using the modes on the bottom right. 

1307-1311 Liberty St
KCMO, MO, 64102
United States

816-421-1930

Good Ju Ju was voted "Kansas City's Best Antique & Vintage Store" three years in a row from multiple Kansas City media outletsGood JuJu was also voted one of the "Best Antique Stores - Coast to Coast" by Flea Market Style magazine. 

Good Ju Ju is an event venue in KC's historic West Bottoms area, and we're only open one weekend a month on "First Friday" weekends.  

We're known for having all the cool, fun, vintage, retro and antique goods from the 1880's to the 1980's!

Good Ju Ju Blog

Welcome to the Good Ju Ju blog.  We hope this will inform you, entertain you, make you laugh, smile and maybe even shock you a little.  It's here for a lot of reasons, but mostly to include you as part of our vintage and antique family.  So subscribe to our blog and we'll send you updates when we post new info.


Just Because You Could, Doesn't Mean You Should.

Good JuJu

Being a Good Ju Ju vendor is a joy.  Where else can you do what you love and meet lots of wonderful people in the process?

Occasionally, we will hear customers (typically a husband and wife), talking about a piece of furniture that we've repurposed, only to hear one of them (sorry guys, it's usually the husband) say, "We don't need to buy this -- I could do this!"  We agree with them, with a gentle reminder to look closely at what such a project entails.  And ladies, we won't talk about all those projects that our husbands start but never finish.  So, in the interest of full disclosure, we'll take an example and see what it actually takes to 'do this.'

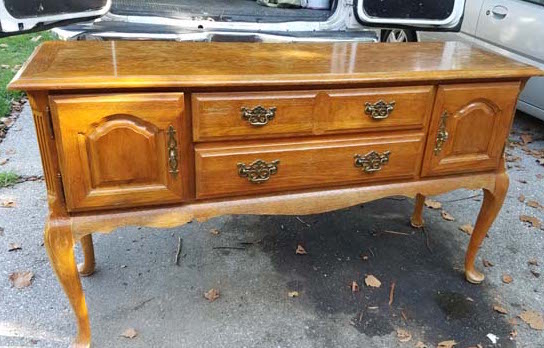
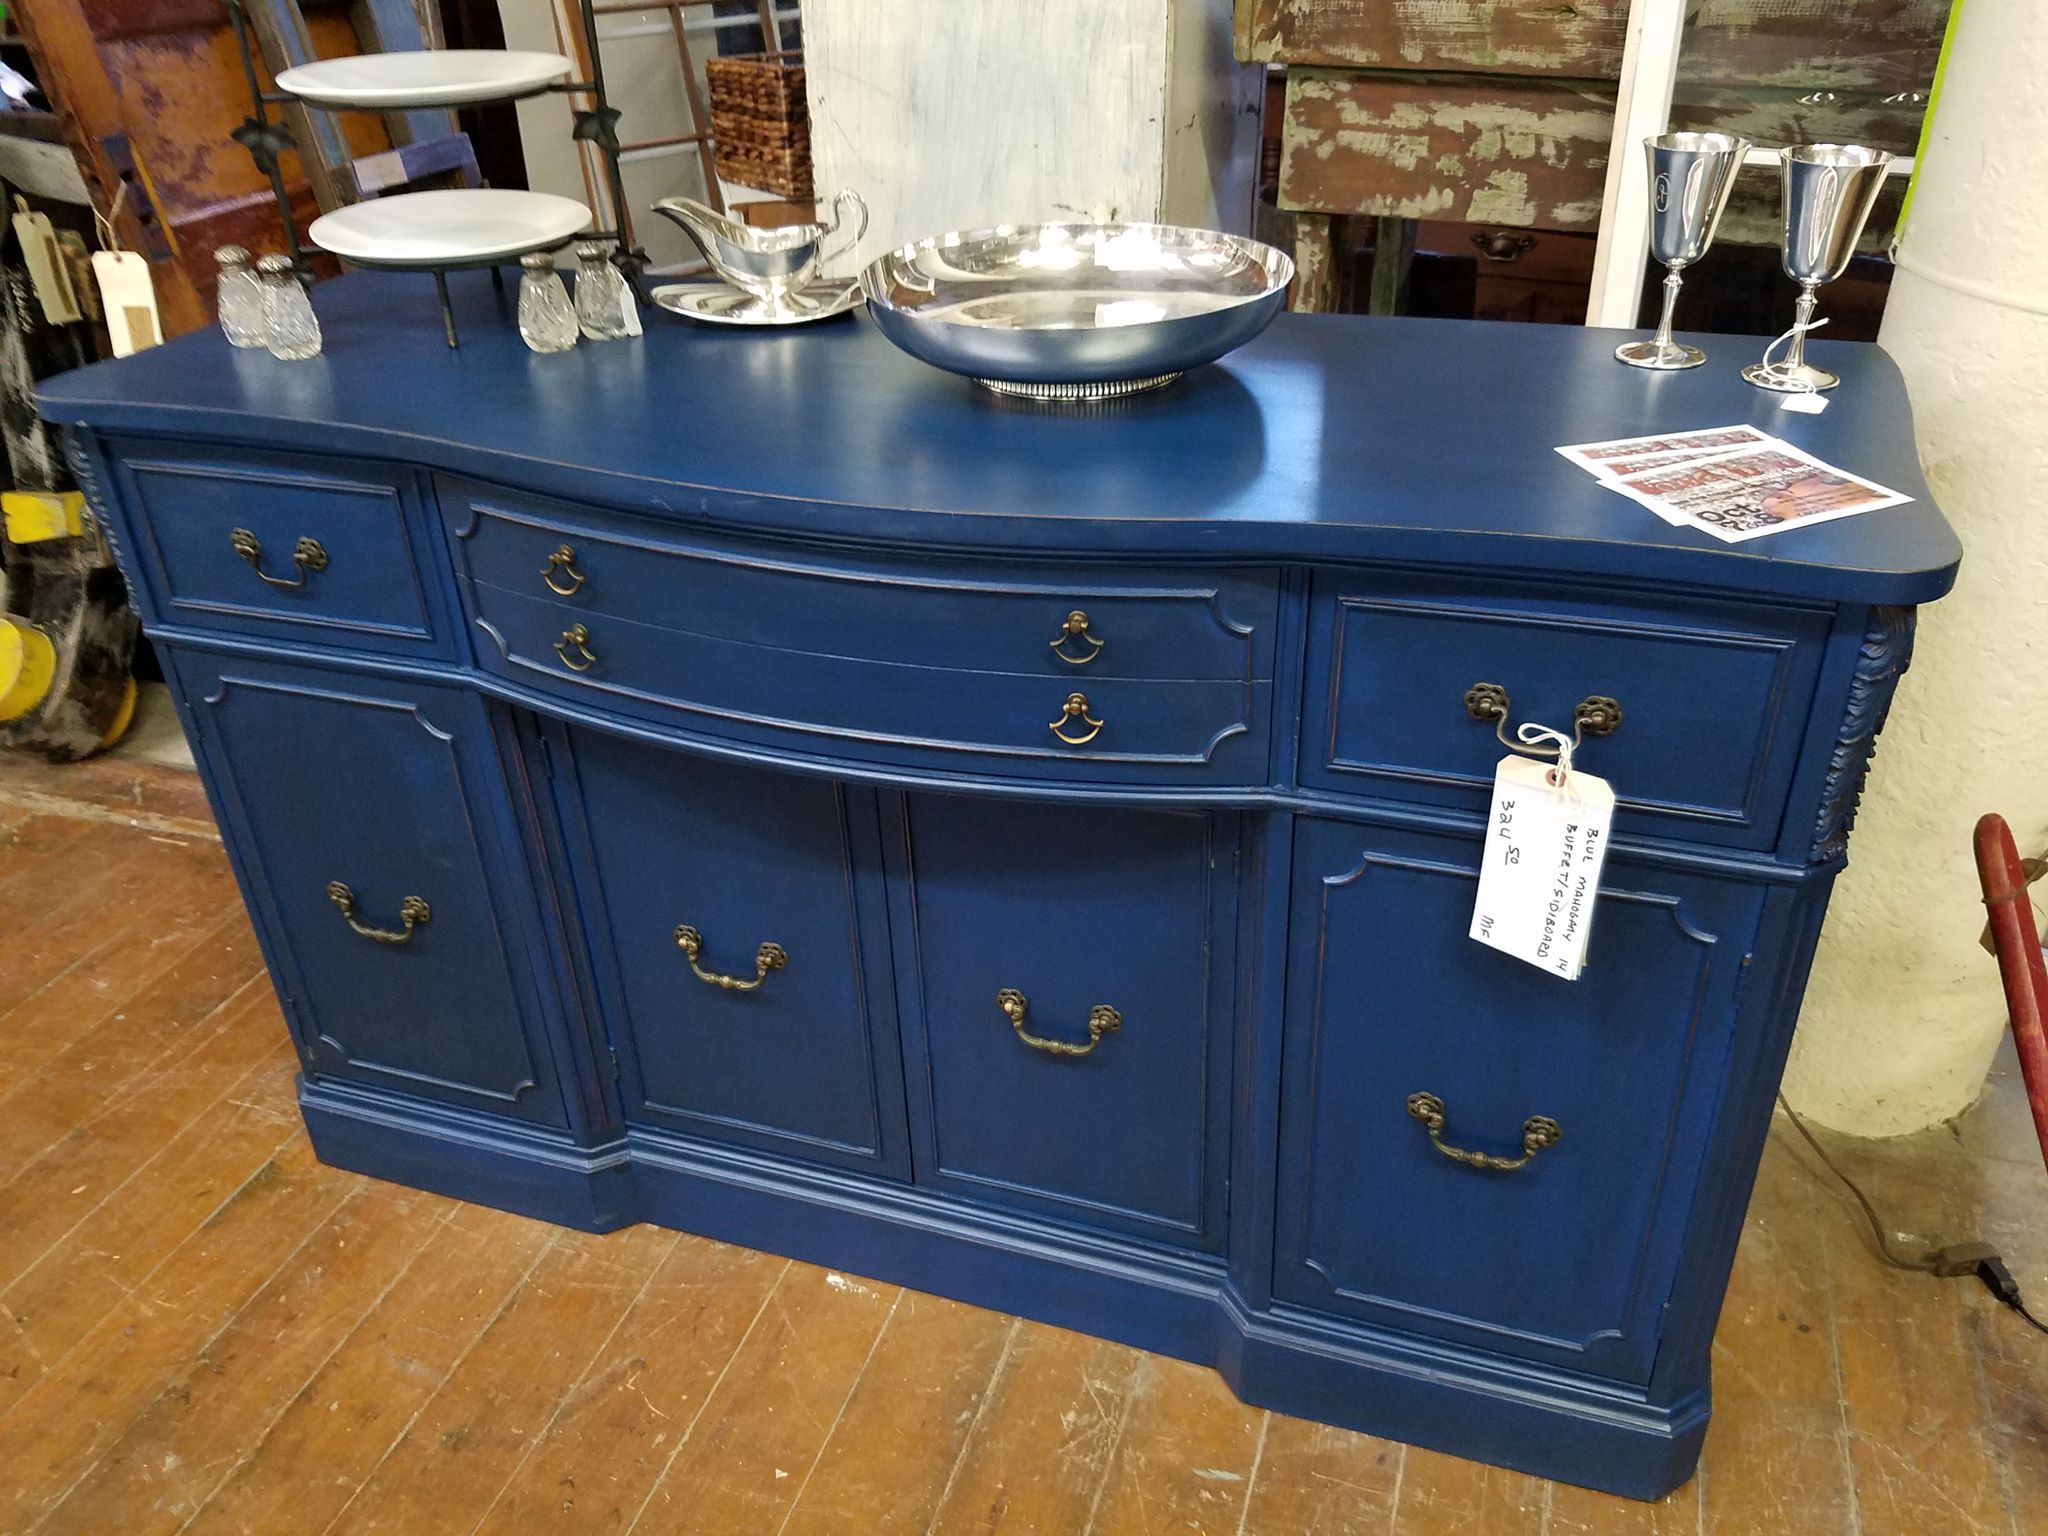
Let's look at a dresser renovation.  Now, if you already have the dresser -- great!.  If not, then searching through garage sales, estate sales, thrift shops, used furniture stores or Craigslist will take some time.  Be sure to purchase good quality furniture, with sound drawer runners and no structural damage.  Solid wood/wood veneer pieces will cost considerably more than those made of MDF (medium density fiberboard) or particle board.

Quality Paint Brushes

If you plan on painting your dresser, then it's time for a trip to the hardware store.  You will need paint $15-20), a paint brush ($5-10), some sort of topcoat/polycrylic ($15-20) and a foam brush ($1) for the topcoat.  Before you paint, you might need to sand or degloss the original finish.  Add to the list sandpaper in a variety of grits ($5-15) and/or a liquid sandpaper/deglosser product ($10-20), and tack cloth ($5) to remove any bits of sawdust or debris.  All of the above implies doing things manually.  You could invest in an electric sander or paint sprayer instead, which would cost more.  Or, if you would like to use a chalk paint & wax technique rather than latex, that will add another $20 to your paint cost and $20-30 to your brush cost.

If you're utilizing a piece of furniture you already have, then your costs so far are in the $56-81 rangeIf not, add in the cost of your dresser.  But wait.  If you want to change the hardware or replace missing hardware, then add that in.  Most good quality hardware runs between$5 and $10 per drawer/door.  On a 9-drawer dresser that can add up.  We won't include hardware in the above totals, but be sure to keep it in mind.

paint

Now let's list the time involved in the project.  You've spent at least an hour at the hardware store (not counting drive time).  You get home, get your supplies laid out, and are ready to get started.   Remove the hardware from the piece (15 minutes on average).  Sanding/deglossing  & wiping down (1 hour).  Let's start painting.  Depending on the size of your piece, allow at least 1 hour per coat.  Most pieces take at least 2 coats, sometimes more.  Allow for adequate drying time, sometimes up to 24 hours between coats in humid weather.  If you want a distressed look, more sanding will take 15-30 minutes.  Another wipe down with the tack cloth and you're ready for your topcoat.  You'll need at least 2 coats (sometimes more) to achieve the desired finish.  Each coat should take an hour.  As with the paint, allow adequate drying time between coats.  Reinstall your hardware and reassemble your piece.  Looks great, doesn't it? 

So how much time did it take, and what is your time worth per hour?  A rough total of the above (not counting drying time) adds up to a minimum of 8 hours of hands-on work.  At the current minimum wage of only $7.25 an hour, that's $58.  Of course, a professional would charge more for their time, with a more professional-looking result.

Just in supplies and labor the costs are a minimum of $114 or more (depending on your actual supply list and labor cost).  Be sure to add in the cost of the dresser itself and any hardware repair/replacement. 

It can certainly be rewarding refinishing and repurposing your own furniture.  There's nothing like the satisfaction of looking at a piece and saying, "I did that."  However, if you're not the handy type, or don't have the time to devote, then a $200-300 dresser at Good Ju Ju doesn't look like such a bad deal!

Painted Dresser

By Mary Farley

Glass Cat Vintage

Antique and Vintage Glassware - An Obsession

Good JuJu

OK ... I admit it ... I'm a sucker for vintage glass.  Kitchenware, glassware, pitchers, candle holders, bon bon dishes, bowls, decanters, centerpieces.  You name it -- I like it all.  Our Mothers and Grandmothers had their favorite pieces and patterns, from makers such as Fostoria, Cambridge, Anchor Hocking and Libbey.  And don't forget the 'special occasion' glassware, typically from Waterford, Baccarat or Steuben.  Not to be overlooked is gorgeous lead crystal from Scandinavian makers Kosta Boda and Orrefors. 

Sadly, as the years rolled by, old sets of glassware were usually relegated to boxes in the basement or attic, where they sat, unused and unappreciated.  If no one in the family wanted them, they were often donated to thrift shops or simply thrown away.

However, glass (especially clear glass) is experiencing a renaissance.  A new generation is realizing that the old adage, 'they don't make things like this anymore' certainly applies to fine glassware.  Setting a beautiful table for a party or family gathering is now back in style, and lovely glass is taking center stage once again.

Rosepoint Stemware

And let's not leave out the man cave or bar area.  Beautifully etched and cut decanters, rocks glasses and tumblers are flying off the shelves.  Want a more Mad Men look?  Go for Imperial Hollywood Regency glassware, which comes in a variety of gold geometric designs. 

Hollywood Regency Glasses

And beautiful glass isn't just meant for drinking.  Decorating with more utilitarian types of glass is also popular.  Apothecary jars, glass cylinders, spice jars, baking dishes and glass cookware offer a myriad of decor possibilities.  Fill a jar with lemons, pine cones, Christmas ornaments or anything your heart desires to add a pop of color to a monochromatic color palette.  Grandma's old glass mixing bowls evoke childhood memories of favorite cakes and licking the spoon. 

Antique Apothecary Pharmacy Bottles

And whether decorating or setting a table, don't think that everything has to match.  If you're going for a shabby chic look, mismatched stemware and serving pieces on a rustic farm or harvest table is a perfect look.  Add a variety of beautiful dishware and different napkins, and your guests will be fighting over which place setting at which to sit!

No matter how you acquire your beautiful glass, here are a few tips to keep it in tip-top shape.

  • Never ... repeat after me ...NEVER wash your fine stemware in the dishwasher.  They will end up clean, but they will eventually be etched by the abrasives found in most dishwasher detergents.  Etching equals cloudiness -- not good!
  • So, to keep that Cambridge Rose Point (or other favorite pattern) shining and crystal clear, hand wash in hot water with your favorite liquid detergent (I use Dawn).
  • Put each piece into the sink individually (as you wash it).  Don't stack glasses in the sink for them to clink together -- that is the easiest way to acquire fleabites and rim chips.
  • Store your glassware upside down on a shelf or hanging from their bases on a rack to keep dust from building up on the inside.

And most important of all -- don't just look at your beautiful glassware.  USE IT!!!

By Mary Farley

Glass Cat Vintage

Before & After Buffet Project

Good JuJu

Stanley Buffet Project - Before

While recently shopping for treasures, I spied a lovely vintage Stanley buffet at a sale.  Queen Anne legs, killer hardware and LOTS of storage -- what a peach!  However, the original finish was badly sun damaged and neglected.  This poor thing definitely needed some TLC.   

Now for the perennial question:  Should I stain or paint?  That's probably one of the hardest choices for furniture DIY’ers to make.  If you think about it, there really is no 'wrong' answer.  It's your piece, and you can do with it what you wish.  If you don't like how it turns out, try something new.  The Furniture Police are not going to swoop down and issue a citation for 'improper paint application.'  Still, it can be daunting to put that first brush-full of paint on the as-yet-unpainted wood.  I certainly had those misgivings the first time I painted a piece of furniture.  But once you give yourself permission, and realize that there are no mistakes you can't undo, then it's full steam ahead.

After mulling it over for a few days, I decided that a buffet of this design and quality deserved a clean, classic finish.  Since it's going to be for sale, I decided upon a beautiful, black paint.  While I've used chalk paint in the past, I have yet to find a black chalk paint that gives me the deep, dark color I desire -- most black chalk paints look ashy to me.  So, as I do for all my black furniture, I went with a Valspar Signature paint in my favorite black to date -- 'Cracked Pepper.'  It's not a pure black, but has just enough grey in it to keep things interesting.   

Painting tip:  After much trial and error, I've found that painting with a matte or flat paint is best.  It's easier to apply and dries faster because it contains less latex.  Since I'll be applying multiple layers of poly, a satin or semi-gloss paint is really unnecessary.

I typically try to avoid painting hardware, so off came the drawer and door pulls AND the door hinges.  The top and sides were especially sun damaged, with the finish worn in 'ridges.'  So I broke out the orbital sander and 80 grit sandpaper.  Any unsanded areas were cleaned with a liquid sandpaper/deglosser product.   Forty-five minutes later, I had a smooth, paintable finish.

When painting furniture, I'm a firm believer in multiple, THIN coats of paint.  This piece took 3 coats, but since I used flat paint (which dries quickly), I was able to get all the painting done in just two days.  I chose to do some 'light' distressing, as buyers like it and... well ... it just looks good.  Three coats of Minwax PolyCrylic finished the job.  With the hardware reinstalled and the piece re-assembled, I'd say this beauty is ready for the next First Friday at Good Ju Ju!

Stanley Buffet Project - After

What do you think?  Please post your comments and questions!


By Mary Farley

Glass Cat Vintage

Fall Is On Its Way

Good JuJu

Fall-decorating-with-table-centerpieces

It’s September and that means lower temperatures, leaves changing colors and pumpkin spice lattes!  It also means its time to think about fall decor.  At Good Juju the booths are packed full of Autumn decor sure to inspire you.

From real pumpkins to handmade pumpkins they are perfect for Fall, Halloween and Thanksgiving.   

Fall-decorating-with-rusty-crusty-antiques

A little rust and crust and aged wood goes perfect with this time of year.  And this cute little scarecrow compliments both very well.

4-Fall-decorating-with-cornstalks.jpg

Natural elements are also perfect and are oftentimes cheap or free and add a lot of character to your fall decorating.  Corn ears, apples, pinecones and corn stalks all add harvest cheer without breaking the bank.

Fall-decorating-with-Rusty-antiques
Fall-decorating-with-mums
Fall-decorating-with-vintage-glass
Fall-decorating-with-antique-crocks-and-cornstalks
Fall-decorating-with-antique-windows-and-wreaths

Also, mums are a staple to fall decorating. They look amazing in hanging baskets, on a porch or part of a fall themed tablescape.

Unique Decorating Ideas With Antiques and Mums

It’s hard not to think about apple picking, apple butter and apple pie in the Fall time.  Adorable little signs like this apple sign accents can be found throughout the store and looks great in the kitchen all year round.

Fall Decorating with Vintage Style Signs

Cute little critters like these owls also make a big statement when decorating your home for fall.  These little guys would look cute on a mantle and can also be used for Christmas decor by adding a bow and other winter themed decor.

Fall Decorating With Owls

All this and so much more can be found here at Good Ju Ju next month in October!

Article by Sarah Elder

Owner of My So Called Junky Life

Go for the GOLD – or SILVER – or BRONZE

Good JuJu

Metallic colors aren’t just fashion statements for Olympic athletes. If you pick up a current home décor magazine or tune into one of your favorite decorating shows, you are likely to see some metallic colors – gold / silver / champagne / copper / bronze - used in many decorating schemes. While one metallic color may be trending higher than others at any given time, they always seem to be present in one way or another. Metallic colors are timeless and can often be considered neutrals. This blog post will concentrate on gold right now since that still seems to be the current home décor trend, but feel free to use any metallic color that you like in your home. As always, you should always decorate with what you love living with and looking at rather than just what is in fashion. 


No matter whether you like to use metallic in an all-out way or as subtle accents, there are some easy ways to add to or change your room décor to utilize metallic colors. 

For accent pieces, give these simple ideas a try in your home:
1)    Throw pillows – Gold is a wonderful, warm color that will brighten up a neutral or colorful room – add a pillow to the sofa, bed or your favorite reading chair. 


2)    Candlesticks – Brighten the dining room table, a bedside table or the entry hall with gold candleholders; add white candles and you can’t go wrong with any surrounding color scheme.

3)    Picture frames and mirrors – Add a new frame or mirror to your wall décor or paint an existing one – a metallic gold color really brightens up a wall.

To make a larger statement, try one, or all, of these ideas:
1)    Lighting - Change out a light fixture. Consider an antique or vintage chandelier.
   

5.png
6.png


2)    Furniture - Add a furniture piece (coffee table, end table, nightstand) with a gold metal base. If you already have a table that you love and that table has a metal base, get out the gold spray paint!